This sub-menu contains effects that mimic traditional artistic drawing media, such as ink, pencil, and oil paint.
Artistic Effects
Note
The examples on this page show the effects being applied to an entire image. It is easy to restrict the adjustment to a sub-section of the image simply by making a selection.
If a selection is active when the effect is run, it will only be applied to the selected region. Areas outside of the active selection will remain unchanged.
Tip
The controls shown in the effect dialogs operate in much the same way; drag the slider left or right, type in a numeric value in the text box or use the up/down arrows beside the text box to change the current value.
The keyboard arrow keys can also be used to alter the value of a control once it has the focus.
Multiple controls can be used in isolation or combination. If more than one is altered, the cumulative effect will be shown.
Ink Sketch
This effect makes an image appear as if it had been inked using a pen.
Ink Outline: Changes the weight or strength of the edging. Larger values result in a thicker/heavier line, while smaller values result in a thinner/lighter line.
Coloring: Determines how much color bleeds through into the resulting image. Low values yield a more desaturated image with less color. Higher values will use more of the original coloring.
Example - Effects > Artistic > Ink Sketch
Linocut
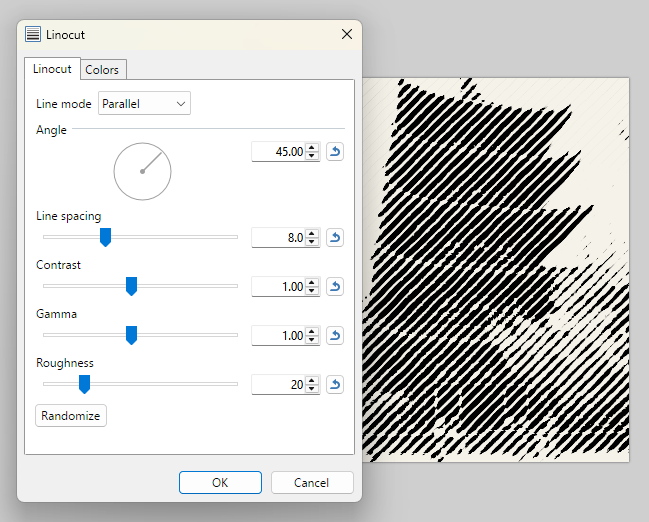
This effect simulates the appearance of a traditional linocut block print.
Line mode: Changes the pattern style of the carved lines. Options are Parallel, Contour, and Cross-hatch.
Angle: Rotates the orientation of the line pattern relative to the horizontal axis.
Line spacing: Controls the distance between adjacent lines.
Contrast: Adjusts the contrast and intensity of the line work.
Gamma: Adjusts the midtone brightness (gamma) of the effect.
Roughness: Controls the edge texture, ranging from uniform straight cuts to more varied carved edges.
Randomize: Generates a new random seed to re-render the pattern using the current settings.
Colors: Sets the primary ink and background paper colors used for the print.
Example - Effects > Artistic > Linocut
Mosaic
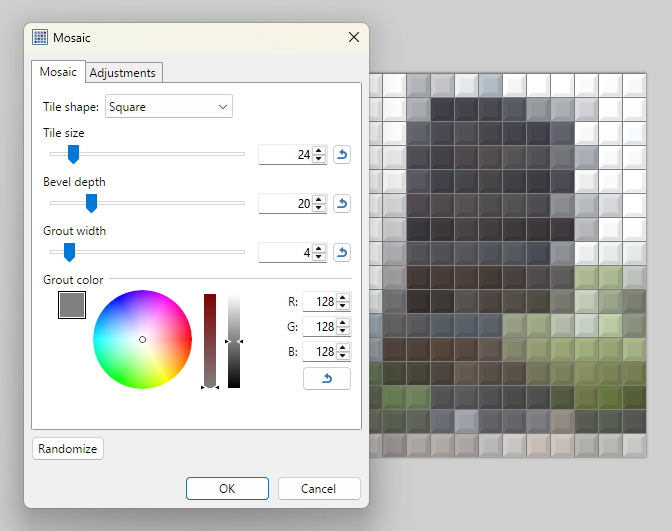
This effect transforms the image into a simulated tile mosaic, complete with customizable grout lines, 3D beveling, and lighting.
Mosaic Tab
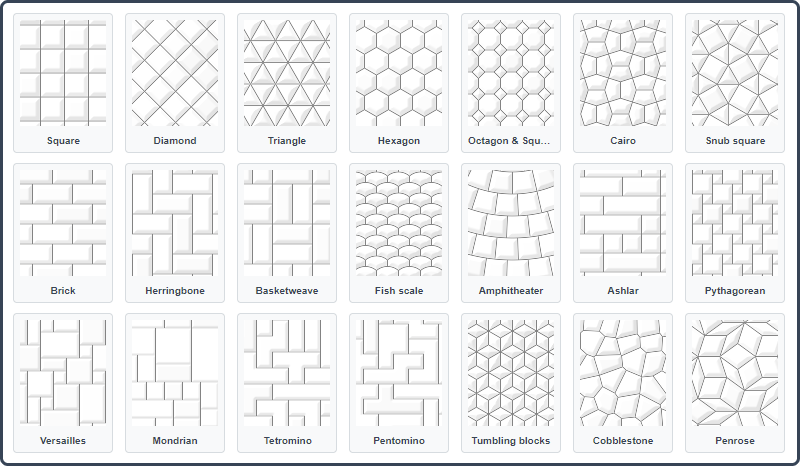
Tile shape: Sets the geometry of the mosaic tiles. Options include:
Square, Diamond, Triangle, Hexagon,
Octagon & Square, Cairo, Snub square,
Brick, Herringbone, Basketweave, Fish scale, Amphitheater,
Ashlar, Pythagorean, Versailles, Mondrian, Tetromino, Pentomino,
Tumbling blocks, Cobblestone, Penrose.
Tile size: Controls the physical dimensions of the individual tiles.
Bevel depth: Controls the strength of 3D edge beveling applied to each tile to give it the illusion of depth.
Grout width: Sets the thickness of the grout lines separating the tiles.
Grout color: Defines the color of the grout filler between tiles.
Randomize: Generates a new random seed to re-render the jitter patterns using the current settings.
Adjustments Tab
Tile color: Determines how color is sampled for each tile. Average samples the overall color covered by the tile, while Center pixel samples only the center pixel.
Light angle: Adjusts the direction of the light source, altering highlights and shadows along the tile bevels.
Lightness jitter: Introduces random brightness variations across individual tiles for a textured look.
Position jitter: Shifts the color sampling location randomly to introduce subtle color variations between adjacent tiles.
Anchor: Sets the point where the tiling pattern begins.
Example - Effects > Artistic > Mosaic
Example - Mosaic tiling shapes
Oil Painting
This effect is used to transform an image as though it were painted with oil paint.
Brush size: Changes the apparent size of the virtual brush tip. Larger values result in a coarser appearance as if a larger brush had been used.
Smaller values give more delicate results as if a finer brush had been employed.
Coarseness: Determines how much detail is captured in the transformation. Low values yield less detail, while higher values provide a higher quantity of smaller details.
Another way of thinking about Coarseness is the amount of time the painter had to paint the image. If more time were available, the artist would be able to include a greater number of smaller details.
Example - Effects > Artistic > Oil Painting
Pencil Sketch
This effect transforms an image to appear as though it were sketched with a pencil.
Pencil tip size: Determines how sharp or blunt the virtual pencil is. Larger values result in a thicker, heavier appearance to the lines.
Smaller values give more delicate results as if a sharper, finer pencil had been employed.
Range: Dictates how much detail is captured in the sketch.
Like the Coarseness value in the Oil Painting effect, low values yield less detail, while higher values reveal smaller details.
Example - Effects > Artistic > Pencil Sketch
Pointillism
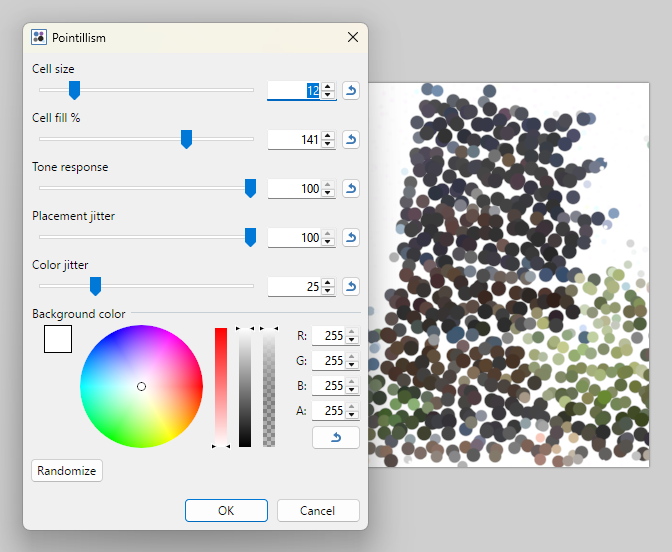
This effect transforms the image into a painting composed of small, distinct dots of color, simulating the traditional pointillism technique.
Cell size: Sets the grid size that determines the overall scale and density of the dots.
Cell fill: Controls the dot coverage within each cell, adjusting the spacing and gaps between adjacent dots.
Tone response: Adjusts how sensitive the effect is to brightness variations, controlling how tonal shifts generate new dots.
Placement jitter: Introduces spatial randomness to dot positions. A value of zero produces a uniform grid, while higher values create an organic, scattered placement.
Color jitter: Adds subtle hue and value variations to individual dots. A value of zero maintains uniform colors, while higher values introduce more color diversity.
Background color: Defines the canvas color visible in the spaces between dots.
Randomize: Generates a new random seed to re-render the pattern using the current settings.
Example - Effects > Artistic > Pointillism
Stained Glass
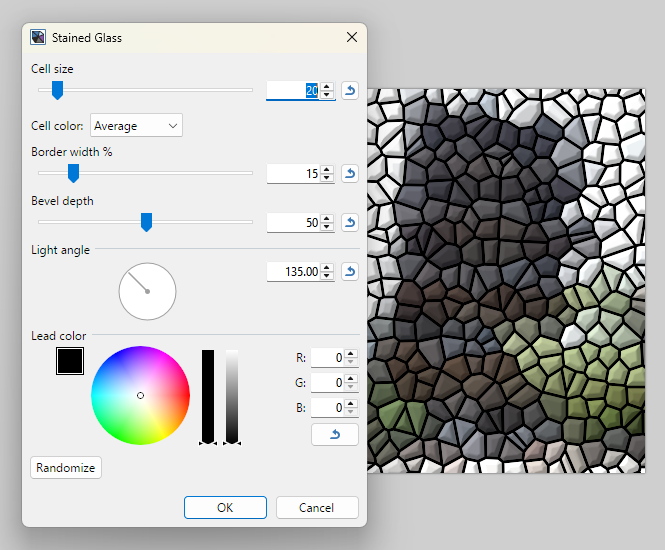
This effect transforms the image into a simulated stained glass artwork composed of colored glass fragments bound by lead came lines.
Cell size: Sets the overall scale and density of the glass fragments.
Cell color: Determines how color is sampled for each fragment. Average samples the overall color covered by the fragment, while Center pixel samples only the center pixel.
Border width: Controls the thickness of the lead borders separating the glass pieces.
Bevel depth: Adjusts the 3D edge beveling on each glass fragment to create the illusion of glass thickness and depth.
Light angle: Sets the direction of the light source, altering highlights and shadows along the bevels.
Lead color: Defines the color of the lead came border between glass fragments.
Randomize: Generates a new random seed to re-render the fragment pattern using the current settings.

 Ink Sketch

 Linocut
 Mosaic
 Oil Painting

 Pencil Sketch

 Pointillism
 Stained Glass